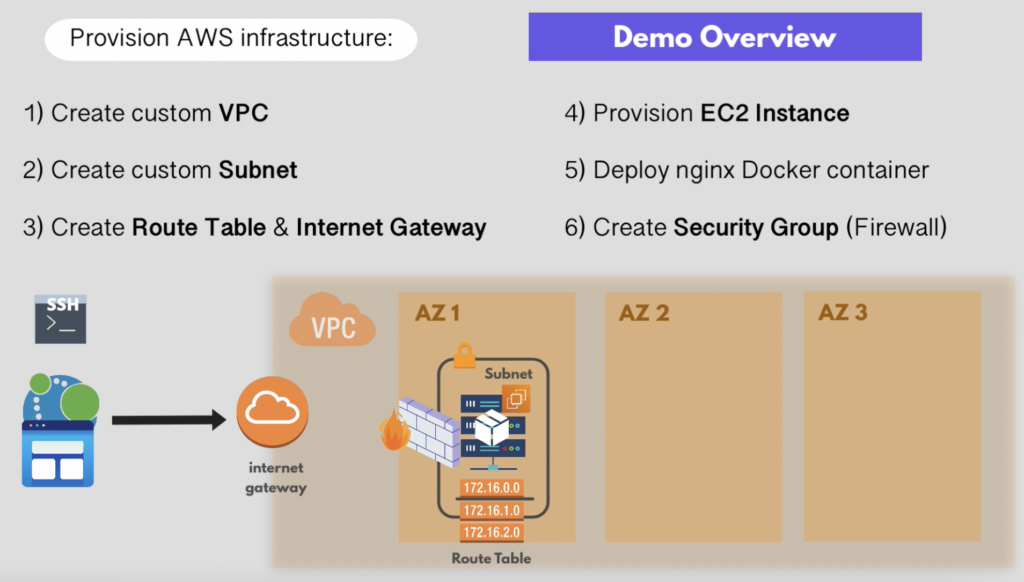
EC2 on AWS using Terraform
Overview
- Deploy an EC2 instance on AWS running a simple Docker container (Nginx).
- Create a custom VPC instead of using the default one.
- Set up a subnet in one Availability Zone (AZ) for a simple use case with one server.
- Connect the VPC to the Internet using an Internet Gateway, allowing inbound/outbound traffic.
- Deploy EC2 instance inside the configured subnet.
- Simulate a web application deployment by accessing the Nginx container via a web browser.
- Configure firewall rules (Security Group):
- Open HTTP (80) to access Nginx.
- Open SSH (22) to connect to the server remotely.
Note: When you have a multi-server deployment, basically you just must create this whole network and infrastructure configuration once. So, you have just one VPC, maybe multiple subnets and you just deploy all the servers inside.
VPC s Subnet:
Create a custom VPC (myapp-vpc) and a subnet (myapp-subnet) inside an availability zone of the selected region.
Use input variables for:
- vpc_cidr_block and subnet_cidr_block to define CIDR ranges dynamically.
- availability_zone for flexibility.
- env_prefix to prepend environment names (e.g., dev-vpc).
String Interpolation: Use ${var.variable_name} inside strings for dynamic naming (e.g., ${var.env_prefix}-vpc).
# Configure the AWS Provider provider “aws” {
}
#variables
variable “vpc_cidr_block” {} variable “subnet_cidr_block” {} variable “avail_zone” {} variable “env_prefix” {}
# Create a VPC
resource “aws_vpc” “terraform-vpc-demo” { cidr_block = var.vpc_cidr_block
tags = {
Name = “${var.env_prefix}-vpc”
}
}
# Create a VPC subnet under the VPC, we will create resource “aws_subnet” “terraform-subnet-1” {
vpc_id = aws_vpc.terraform-vpc-demo.id cidr_block = var.subnet_cidr_block availability_zone = var.avail_zone
tags = {
Name = “${var.env_prefix}-subnet-1″
}
}
terraform.tfvars:
vpc_cidr_block = “10.0.0.0/16”
subnet_cidr_block = “10.0.10.0/24”
avail_zone = “eu-central-1b”
env_prefix = “dev”
Route Table s Internet Gateway:
Internet Gateway will be used to expose the VPC to the Internet. AWS automatically generates a Route table and network ACL ,security Group for every new VPC. The
route table acts as a virtual router managing internal traffic, while the network ACL
(firewall for subnets) allows all traffic by default but can be customized.
Default Route Table:
- Handles internal VPC traffic (e.g., EC2 instances) by routing within the VPC’s CIDR block (10.0.0.0/16).
- No internet connectivity by default; all traffic stays inside the VPC.
Custom Route Table with Terraform:
- Creating a new route table with two routes:
- Internal traffic (handled automatically).
- Internet-bound traffic (configured manually with an IGW).
Internet Gateway (IGW):
- Required to connect the VPC to the internet.
- Defined using aws_internet_gateway and linked to the VPC.
- Referenced in the custom route table to allow external access.
By setting up a new route in new route table and IGW, the VPC will support both
internal communication and internet connectivity as per the Terraform configuration.
Route Table & Subnet Association:
- A route table is created inside the VPC, but subnets must be explicitly associated with it.
- By default, unassociated subnets are linked to the main route table of the VPC.
Terraform Implementation:
- Terraform defines subnet-to-route table associations using two parameters: subnet ID and route table ID.
- Once associated, all traffic from the subnet (including EC2 instances) will be handled by this route table.
Create new Internet Gateway , Route table and Route subnet association:
# Create internet gateway
resource “aws_internet_gateway” “terraform-gateway” { vpc_id = aws_vpc.terraform-vpc-demo.id
tags = {
Name = “${var.env_prefix}-gateway”
}
}
#Create route-table for VPC
resource “aws_route_table” “terraform-route-table” { vpc_id = aws_vpc.terraform-vpc-demo.id
route {
cidr_block = “0.0.0.0/0”
gateway_id = aws_internet_gateway.terraform-gateway.id
}
tags = {
Name = “${var.env_prefix}-route-table”
}
}
# Associate the route-table we create to subnet
resource “aws_route_table_association” “a-rtb-subnet” { subnet_id = aws_subnet.terraform-subnet-1.id route_table_id = aws_route_table.terraform-route-table.id
}
Note:
Tags help identify resources and associate them with a specific environment. Terraform automatically determines the order of resource creation, ensuring dependencies are managed without manual ordering.
The route table acts as a virtual router, while the Internet Gateway serves as a virtual modem
This setup ensures internal communication within the VPC while enabling external connectivity via Terraform-managed resources.
Use the Main(Default) Route Table
Option to Use Default Route Table:
- Instead of creating a new route table, we can modify the default route table provided by AWS.
- Terraform allows referencing the default route table ID instead of defining a new VPC ID.
Subnet Association Behaviour:
- No need for explicit subnet associations since all unassociated subnets are automatically linked to the main route table.
- This simplifies configuration while ensuring proper traffic routing.
#Use default route table
resource “aws_default_route_table” “terraform-default-rtb” { default_route_table_id = aws_vpc.terraform-vpc-demo.default_route_table_id route {
cidr_block = “0.0.0.0/0”
gateway_id = aws_internet_gateway.terraform-gateway.id
}
tags = {
Name = “${var.env_prefix}-route-table”
}
}
Security group
Purpose of Security Group:
- Allows SSH access (port 22) and NGINX web access (port 8080).
- Associated with VPC to secure EC2 instances inside it.
Security Group Rules:
-
Ingress (Incoming Traffic Rules):
-
-
SSH (Port 22) → Restricted to specific IP (laptop IP).
-
HTTP (Port 8080) → Open to all IPs for web access.
-
-
-
Egress (Outgoing Traffic Rules):
-
-
-
Allows all outbound traffic for software installations, updates, and Docker image pulls.
-
-
variable “my_ip” {}
# Create security group
resource “aws_security_group” “terraform-sg” { name = “terraform-sg”
description = “Allow TLS inbound traffic” vpc_id = aws_vpc.terraform-vpc-demo.id ingress {
description = “TLS from VPC” from_port = 22
to_port = 22
protocol = “tcp” cidr_blocks = [var.my_ip]
}
ingress {
description = “TLS from VPC” from_port = 8080
to_port = 8080
protocol = “tcp” cidr_blocks = [“0.0.0.0/0”]
}
egress { from_port = 0
to_port = 0
protocol = “-1” cidr_blocks = [“0.0.0.0/0”] ipv6_cidr_blocks = [“::/0”]
}
tags = {
Name = “${var.env_prefix}-sg”
}
}
Security group is now ready for EC2 deployment with correct firewall rules . Possible to reuse the default security group instead of creating a new one. Default security groups start with all traffic blocked, requiring modifications
Use default Security Group
variable “my_ip” {}
# Use default security group
resource “aws_default_security_group” “terraform-default-sg” { vpc_id = aws_vpc.terraform-vpc-demo.id
ingress {
description = “TLS from VPC” from_port = 22
to_port = 22
protocol = “tcp” cidr_blocks = [var.my_ip]
}
ingress {
description = “TLS from VPC” from_port = 8080
to_port = 8080
protocol = “tcp” cidr_blocks = [“0.0.0.0/0”]
}
egress { from_port = 0
to_port = 0
protocol = “-1” cidr_blocks = [“0.0.0.0/0”] ipv6_cidr_blocks = [“::/0”]
}
tags = {
Name = “${var.env_prefix}-sg”
}
}
Amazon Machine Image for EC2
variable “instance_type” {} variable “public_key_location” {}
#Filter a AMI
data “aws_ami” “latest-ubuntu-linux” { most_recent = true
owners = [“099720109477”] # Ubuntu
filter {
name = “name”
values = [“ubuntu/images/hvm-ssd/ubuntu-jammy-*-amd64-server-*”]
}
filter {
name = “virtualization-type” values = [“hvm”]
}
}
#Provides an EC2 key pair resource
resource “aws_key_pair” “terraform-key-pair” { key_name = “terraform-key-pair”
public_key = file(var.public_key_location)
}
#EC2 instance
resource “aws_instance” “web” {
ami = data.aws_ami.latest-ubuntu-linux.id instance_type = var.instance_type
subnet_id = aws_subnet.terraform-subnet-1.id
vpc_security_group_ids = [aws_default_security_group.terraform-default-sg.id] availability_zone = var.avail_zone
associate_public_ip_address = true
key_name = aws_key_pair.terraform-key-pair.key_name #Excute command in the EC2 instance
user_data = file(“entry-script.sh”) # user_data = <<EOF
# #!/bin/bash
# sudo apt update -y
# sudo snap install docker.io
# sudo snap start docker
# sudo usermod -aG docker ubuntu
# sudo service ssh reload
# sudo docker run -p 8080:80 nginx
# EOF
tags = {
Name = “${var.env_prefix}-terraform-demo”
}
}
# Get the output of the public IP for the EC2 instance
output “public_ip_address” {
value = aws_instance.web.public_ip
}
EC2 Instance Setup Two required attributes: AMI (Amazon Machine Image) and
Instance Type.
Filter an AMI:
AMI is the OS image for the EC2 instance. AMI varies across regions; instead of hardcoding, query AWS dynamically using the data “aws_ami” block.
Fetching Latest AMI Dynamically:
- Use most_recent = true to get the latest image.
- Specify owners to filter official AWS images.
- Use filters to refine the search by image name patterns.
Instance Type Configuration:
- Use T2 micro (free tier eligible).
- Make it configurable using a Terraform variable.
Customizing EC2 Deployment:
- By default, EC2 launches in a default VPC and random subnet.
- Specify subnet ID and security group to deploy EC2 inside a custom VPC.
- Assign availability zone using a variable.
- Enable public IP for SSH and web access.
SSH Key Pair for Access:
We can attach SSH key pair access in two ways.
One way:
We can Create a key pair (server-key-pair) in AWS and Download and secure the PEM file (~/.ssh directory, restrict permissions).
Use key_name to associate EC2 with the key pair. Example: key_name = “server-key-pair”
Other Way:
Steps to Automate Key Pair Creation and SSH Access Using Terraform
- Generate SSH Key Pair using ssh-keygen (id_rsa C id_rsa.pub).
- Extract the public key from id_rsa.pub and Store it as a variable (my_public_key) so each user can override it
- Alternatively read it from a file:
variable “my_public_key” {
default = file(“~/.ssh/id_rsa.pub”)
}
- Create an AWS Key Pair in Terraform by referring my_public_key variable
resource “aws_key_pair” “my_key” { key_name = “my-key”
public_key = var.my_public_key
}
- In the EC2 resource, replace hardcoded key reference:
key_name = aws_key_pair.my_key.key_name
Advantages of Automating Key Pair Creation
Automating key creation in Terraform prevents manual errors, ensures consistency by allowing developers to use their own keys without modifying code, and simplifies clean-up by removing all resources, including keys, during terraform destroy. It enables easy replication across development, staging, and production environments while eliminating forgotten manual steps, ensuring everything is managed within the Terraform code, reducing the need for extra documentation.
Use user_data for Automatic Execution
Avoid manual work by defining commands as part of the Terraform configuration. Commands should execute immediately after the EC2 instance is created. user_data attribute allows running scripts on the EC2 instance at startup.
This ensures the setup process is part of the infrastructure code. Use multi-line string syntax (<<EOF … EOF) to write the script.
We can write shell script in separate file, and we can refer in user_data Ex: user_data = file(“entry-script.sh”)
Ensure Terraform Recreates Instance on user_data Changes
- Enable replace_on_change flag for automatic instance recreation if the user data script is modified.
- This ensures a clean, consistent state for the EC2 instance.
Terraform Output Public IP
- Modify Terraform to output the instance’s public IP automatically.
- Avoids manually retrieving it from the AWS Console.
Apply Configuration & Access EC2
- Run terraform apply to deploy changes.
- Use the displayed public IP to SSH into the instance and verify NGINX is running.
- Now, accessing publicIP:8080 in the browser should display the NGINX homepage.
Terraform’s Role vs. Configuration Management Tools
Terraform is used for provisioning and managing infrastructure like networking, EC2 instances, and security groups, but its role ends once the infrastructure is created. It cannot debug or manage software installation, and user_data scripts execute commands without feedback, requiring manual SSH access for troubleshooting. To automate post-provisioning tasks like software installation and configuration, tools like Ansible, Puppet, or Chef are needed. Combining Terraform for infrastructure provisioning with Ansible for application deployment ensures a fully automated, scalable, and consistent setup.
Git repositories https://github.com/NeevPrashanth/neev_terraform/tree/main/ec2_aws_poc