Kubernetes Architecture and Kubectl Commands
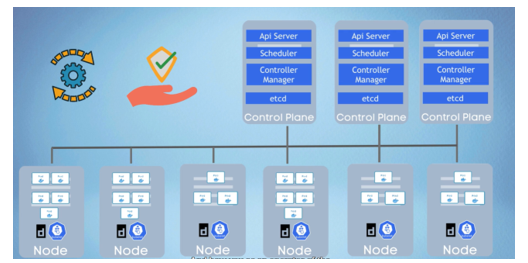
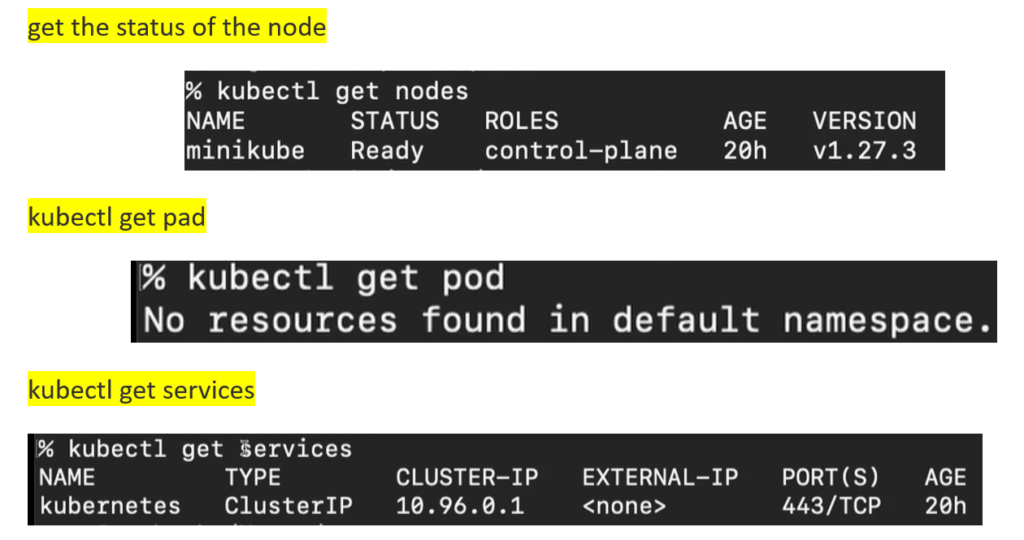
Node Processes (Worker Node)
Worker servers, or Nodes, are one of the main components of the Kubernetes architecture. These cluster servers are where Kubernetes components (such as pods, services, ConfigMaps, secrets, ingress) run. Kubernetes manages worker nodes using three essential processes installed on every worker node.
- Container runtime
- Kubelet
- Kube proxy
Container runtime
container D used in most of the Kubernetes clusters, which is much more lightweight than Docker.
we can run docker images on any container runtime .
Kubelet
kubelet schedules pods. kubelet is responsible for taking that configuration and starting a pod and then assigning resources from node like CPU, RAM, and storage resources to pod.
Kube Proxy
Kube proxy is responsible for forwarding requests from services to pods. Kube proxy has intelligent forwarding logic , which makes the communication works in a performant way with low overhead. For example, if an application replica is making a database call, then instead of service just randomly forwarding the request to any replica, it will forward it to the replica that is running on the same node. Thus, this way avoiding the network overhead of sending the request to another machine.
Control Plane:
Four processes that run on every control plane node that control the cluster state and the worker nodes as well.
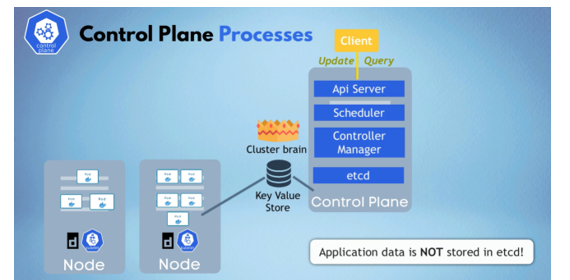
API server
When deploying a new application in a Kubernetes cluster, we interact with the API Server using a client, such as the Kubernetes Dashboard (UI), the command-line tool (kubectl), or the Kubernetes API. The API Server acts as the gateway for all requests, handling updates, queries, authentication, and authorization to ensure only valid requests access the cluster.
As part of the control plane, the API Server validates requests and forwards them to the appropriate components for scheduling pods, creating services, or managing other resources. It also, responds to queries about deployment status and cluster health. Having a single-entry point enhances security by centralizing access control and request validation.
Scheduler
The scheduler responsible for assigning new pods to worker nodes. When the API Server validates a request to schedule a pod, it hands it over to the scheduler, which intelligently selects the most suitable worker node based on resource availability (CPU, RAM, etc.). Instead of random assignment, the scheduler ensures efficient resource utilization by placing pods on the least busy node.
However, the scheduler only decides where the pod should run. The actual process of starting the pod and running its container is managed by kubelet on the chosen worker node, executing the scheduler’s decision.
Controller manager
The Controller Manager is a crucial component that detects state changes in the cluster, such as pod failures. When a pod dies, the Controller Manager identifies the failure and triggers recovery by requesting the scheduler to reschedule the affected pod. Ensuring the cluster maintains its desired state.
ETCD
etcd is a key-value store that acts as the “brain” of the Kubernetes cluster, storing all cluster state information. Every change in the cluster, such as pod scheduling or failures, is updated in etcd, enabling control plane components like the scheduler and controller manager to function correctly.
The scheduler retrieves resource availability from etcd, the controller manager detects state changes from it, and the API Server uses it to provide cluster health and deployment status. However, etcd only stores cluster state information, not actual application data (e.g., database contents).
Example Cluster Setup
In a small Kubernetes cluster, you might have two control plane nodes and three worker nodes. Control plane nodes require fewer resources since they manage cluster operations, whereas worker nodes need more CPU and storage as they run the actual application pods.
As application complexity and resource demands grow, we can scale the cluster by adding more control plane and worker nodes. Expanding a Kubernetes cluster is straightforward:
- To add a control plane node, set up a new server, install control plane services, and join it to the cluster.
- To add a worker node, provision a server, install worker node processes (container runtime, kubelet, kube-proxy), and join it to the cluster.
This scalability allows Kubernetes clusters to grow infinitely, adapting to increasing application resource needs.
Kubectl
kubectl is a powerful command-line tool used to interact with a Kubernetes cluster. Since the API Server is the main entry point to the cluster, all configurations and component management must go through it. This can be done via different clients:
- UI (Dashboard)
- Kubernetes API
- kubectl (most powerful and widely used)
When kubectl submits commands to the API Server, the worker processes in the cluster execute them, handling tasks like creating or deleting pods, services, and other components.
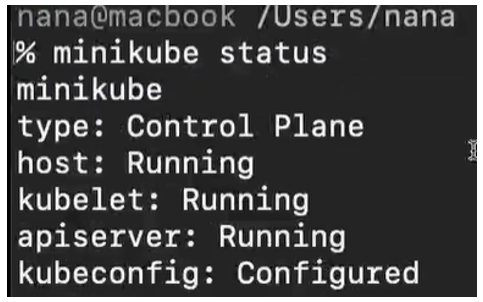
Installation Minikube
minikube is open-Source tool is a one node cluster where the control plane processes and the worker processes both run on One Node and this node will have a Docker container runtime preinstalled. we will be able to run the containers or the pods on this node.
official documentation : minikube.sigs.k8s.io/docs/start/
Minikube can run either as a container or a virtual machine and these are the resource requirements to run minikube on your machine So, make sure you have enough resources.
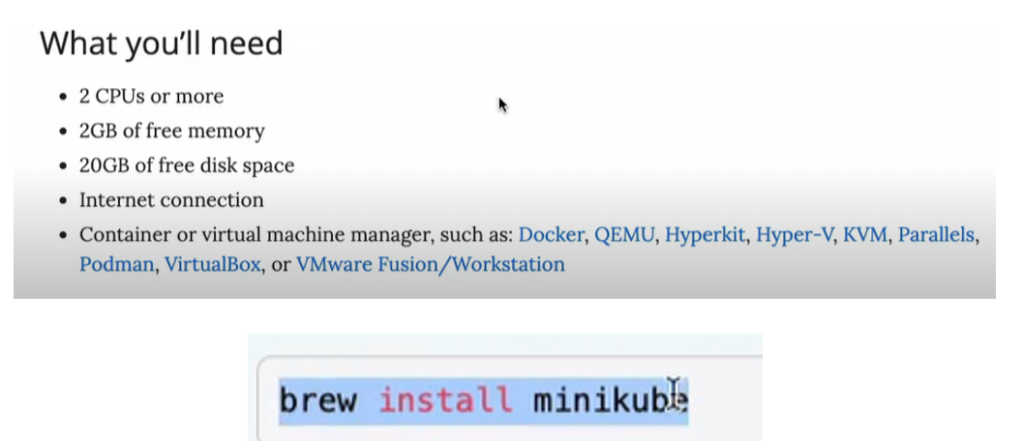
Once minikube is installed we want to start simply executing a minikube start command.
Minikube Requires a Driver: Minikube must run as either a container or a virtual machine, requiring a compatible tool installed on the laptop.
Supported Drivers: Different drivers are available for Linux, macOS, and Windows, with Docker being the preferred driver across all OS.
Two Layers of Docker:
- Minikube runs as a Docker container on the local machine.
- Inside Minikube, Docker is pre-installed to run application containers.
Docker Installation:
- If Docker is already installed, Minikube can be started immediately.
- If not installed, users can download Docker from the official site based on their OS (e.g., macOS with Intel or Apple Silicon).
- minikube start –driver docker
now start to interact with our cluster using kubectl command line tool and kubectl gets installed as a dependency when we install minikube.
Kubernetes CLI- Main kubectl commands
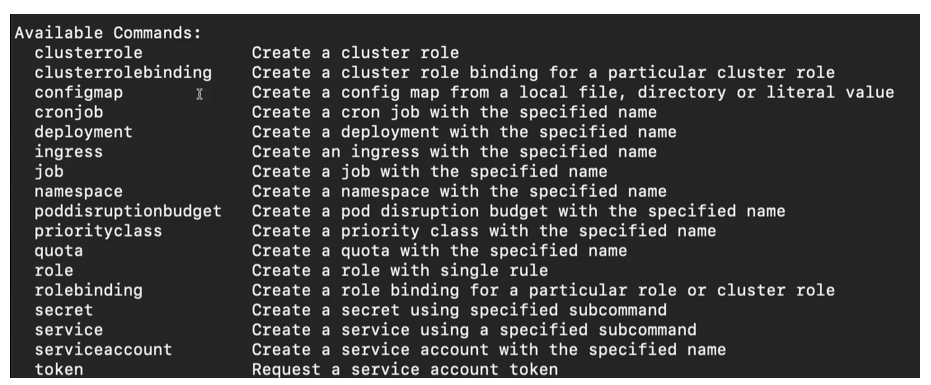
create Kubernetes components there is a kubectl create command.
pod is the smallest unit of the Kubernetes cluster we are not working with the pods directly. There is an abstraction layer over the pods that is called Deployment.

let’s go ahead and create Nginx deployment.

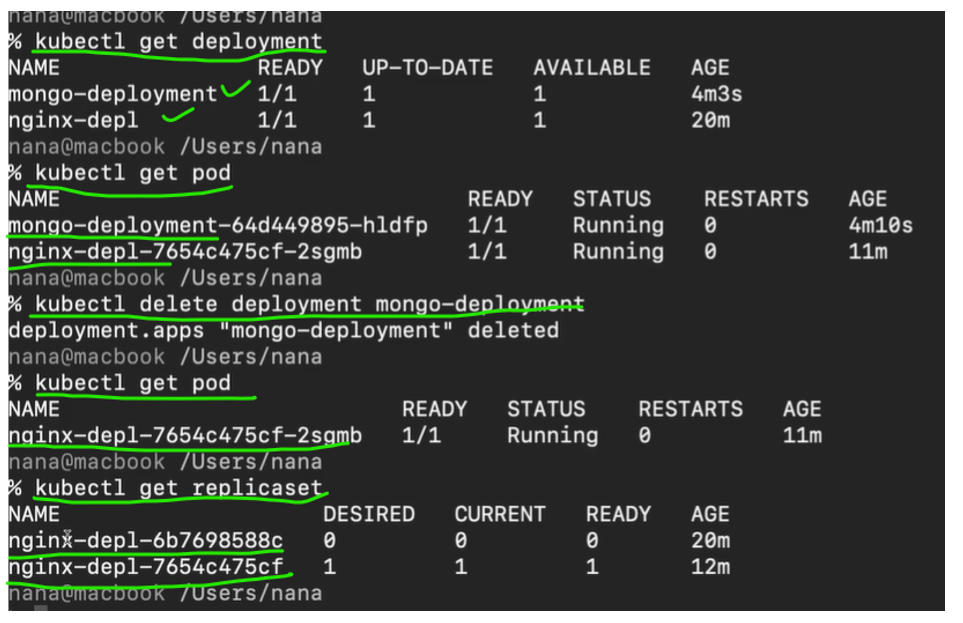
I have one deployment created , So, if I do kubectl get pod we see that now I have a pod which has a prefix of the deployment and some random hash
Between deployment and the pod there is another layer which is automatically managed by Kubernetes deployment called replica set So, if I do kubectl get replica set
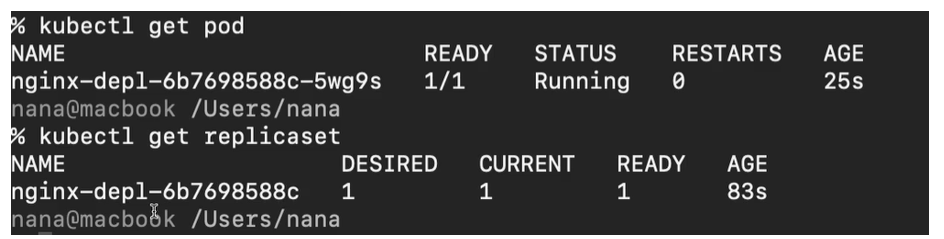
pod name has a prefix of deployment, and the replica sets ID and then its own ID.
The replica set is managing the replicas of a pod. In practise will never have to create replica set or delete a replica set or update in any way. We are going to be working with deployments directly, which is more convenient because in deployment you can configure the pod blueprint completely. We can say how many replicas of the pod you want, and we can do the rest of the configuration there.
Here with this command, we just created one pod or one replica, but if you wanted to have two replicas of the nginx pod, we could just provide as additional options.
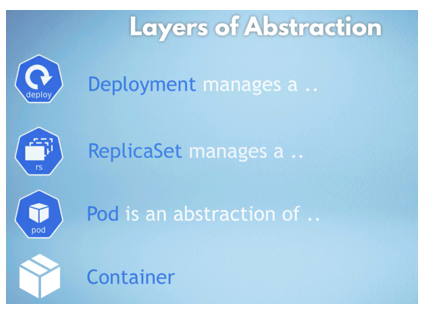
First, we have the deployment the deployment manages a replica set a replica set manages all the replicas of that pod and the pod is again an abstraction of a container and everything below the deployment should be managed automatically by Kubernetes.
for example, the image that it uses I will have to edit that in the deployment directly and not in the pod So, let’s go ahead and do that right away.

It will open editor to edit the deployment.yaml file , if change the image version in it and saved then Kubernetes
- creates a new ReplicaSet for the updated version.
- It launches a new pod with the updated image.
- The old pod is stopped and removed from the previous ReplicaSet.
that is the magic of Kubernetes and that is how it works.
Debugging Pods
Another very practical command is kubectl logs, which shows you what the application running inside the pod logged.
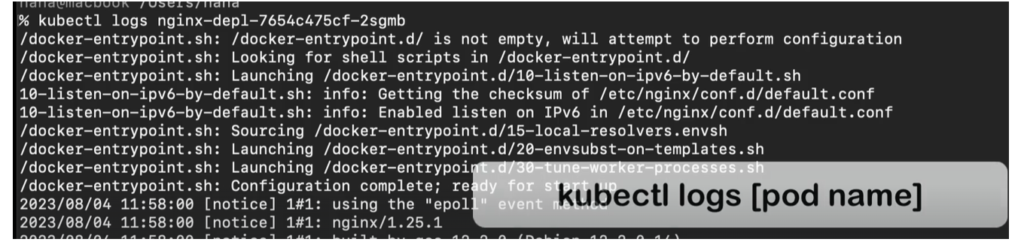
kubectl describe pod <pod name> which here shows us what state changes happen inside the pod So, it’s scheduled the job and then it begins pulling the image.
kubectl exec.

Delete Deployment Apply Configuration File
all the crud operations create delete update et cetera happens on the deployment level and everything underneath just follows automatically.
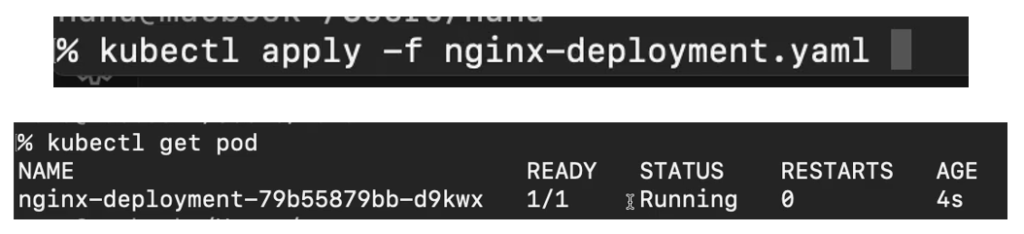
In practise you would usually work with Kubernetes configuration files meaning what component you’re creating what the name of the component is what image is it based on and any other options they’re all gathered in a configuration file, and you just tell kubectl to execute that configuration file and the way you do it is using kubectl apply command.
create a simplistic super basic nginx deployment file. here just specifying what we want to create a deployment the name of the deployment we can ignore these labels right now how many replicas of the pods I want to create. here the template and specification is a blueprint for the pods So, specification for the deployment and specification for a pod and here we are just saying that we want one container inside of the pod. With nginx image and we are going to bind that 80.
we can apply that configuration.

now if I wanted to change Something in that deployment, I would change my local configuration. For example, I wanted 2 replicas instead of one. I can apply that.
As a result, deployment got configured instead created. Bcz already created in previous step. Now we can see one new pod adding to existing pod.
