Terraform and AWS EKS
we’re going to create an EKS cluster using Terraform.
We created the EKS cluster using both the AWS Management Console and EKS control, observing the numerous components involved, including worker nodes, configurations, and AWS-managed background processes.
Managing configuration changes, such as modifying VPC settings, subnets, or worker nodes, requires manually adjusting respective services. Over time, tracking these changes becomes difficult, making it challenging to replicate the same setup in another AWS account or environment.
Similarly, deleting the cluster and cleaning up resources demands reversing all changes manually. Sharing this knowledge with colleagues necessitates documentation, making the process inefficient.
Given AWS’s complexity, automating cluster creation and management with Terraform is a logical solution. Terraform streamlines provisioning, tracking changes, and replicating environments efficiently. In this section, we explore Terraform as the most effective approach for managing EKS clusters.
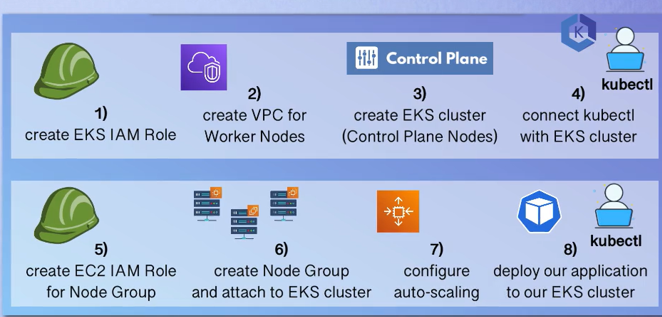
To create an EKS cluster, we first set up the control plane, which is managed by AWS and ensures high availability. Next, we create worker nodes and connect them to the control plane to form a complete cluster for deploying applications.
A VPC is required to host the worker nodes, which can be provisioned as EC2 instances directly or via node groups that handle configuration automatically. Since clusters are created in a specific region with multiple availability zones (AZs), worker nodes should be distributed across these AZs for high availability.
We will automate this entire setup using Terraform configuration.
VPC
The first component which we will create in Terraform is going to be the VPC with all the subnets and all the configuration inside the VPC.
Now remember when we created the VPC using management console or eks control, we used cloud formation, Because cloud formation has a template that configures a VPC in a way that, eks cluster will need it.
cloud Formation is an alternative to a terraform as it’s also an infrastructure provisioning tool. However, specifically for AWS, Terraform is platform independent. Cloud formation is specifically for AWS.
So now we must do something similar here, but we can’t use the cloud formation template. So, what we’re going to use instead is an existing ready module for creating a vpc for the eks cluster.
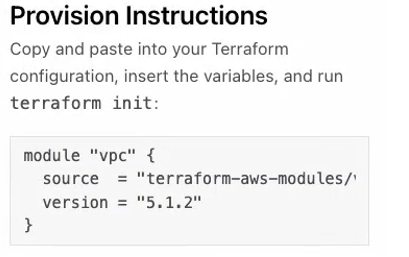
So, in the Terraform Registry we have list of modules and one of them is VPC and we can configure this VPC with all the inputs that we want by just passing in parameters.
And in the background it will create all the necessary resources for VPC and subnets and route tables and so on the Internet gateway. So, we don’t have to worry about that. So, this is the first step we’re going to create a VPC using an existing module and the basic usage syntax here.
I’m going to create a new file and let’s call it vpc.tf And I’m going to paste in the module configuration.
First, let’s give our module a name myapp-vpc, and the source of the module, So just like providers are packages of code that will be installed and downloaded whenever we need them. The modules are also just a code that we need to download if we want to use. Use that in our configuration and this is just a reference to where to download it from.
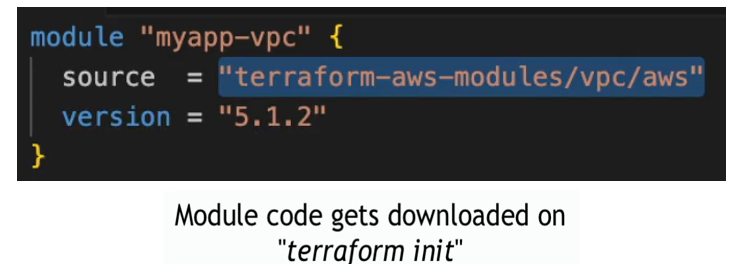
So, terraform will know which module it needs to download, and we can also fix at a version of the module, and here we need to pass in all the attributes that we need to create VPC for eks cluster.
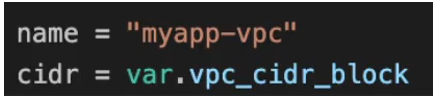
The first one is name of the VPC inside the AWS. This is not a name tag. This is the name column of the resource. Let’s also call it myapp-vpc.
The next one is a cider_block, we’re going to use variables here instead of hard coding all the values, which is a best practise.
inside this module, the subnet resources are already defined, so subnets will be created. We can decide how many subnets, which subnets and with which cider blocks they will be created and for. the best practise is to create one private and one public subnet in each of the availability zones in the region where we’re creating our eks As I said, in my region there are three a AZs, so I need to create one private and one public in each of those AZs , so six in total. And if you have two AZ in your region then you must have one private and one public subnet in each of those two AZs.
way we can define that is by providing private_subnets attribute here and the value is going to be 3 private_subnets and we’re going to also reference it as. Variables.

So, this is going to be an array of cider_blocks and we’re also going to define public_subnets.
Now obviously the subnet cider blocks must be a subset or part of the VPC blocks.

Now we need to define that we want those subnets to be deployed in all the availability zones, right. So, we want them to be distributed to these three AZs that we have in the region. And for that we have an attribute here called azs and we need to define the names of those below.
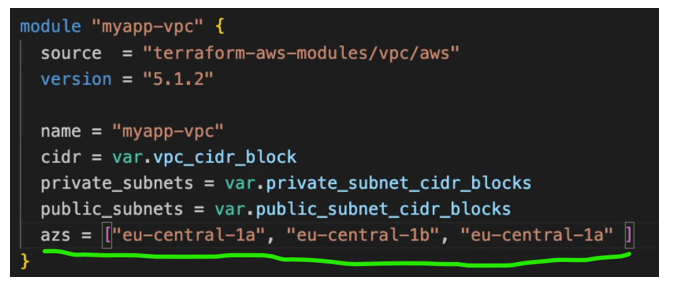
However, we don’t want to hard code these values because what if we want to deploy this in multiple regions, We don’t want those region or AZ names to be hard coded. So, we want to dynamically set them. using data to query the AWS to give us all a AZs for the region.
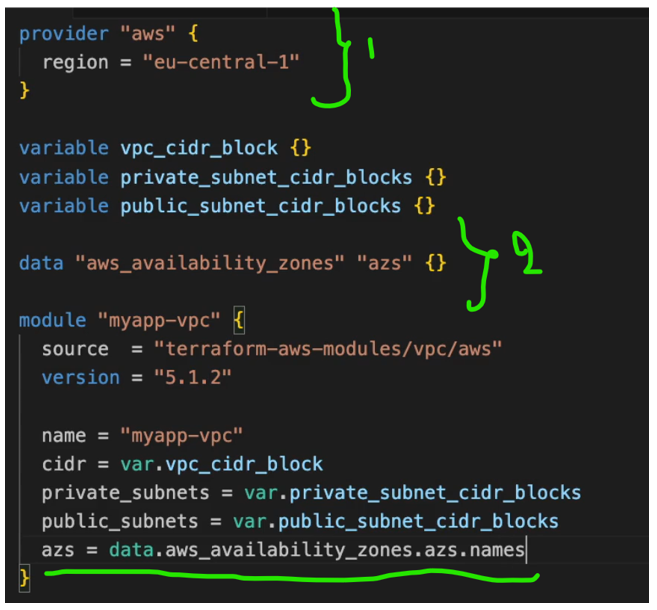
So we have part of the attributes defined here. So we know the VPC cider_block we have configured that we want 3 private subnets and three public subnets and we want them distributed in all the available AZs in our AWS region.
next attribute is enable_nat_gateway. So, by default the nat gateway is enabled for the subnets. However, we’re going to set it to true for transparency and, we’re going to enable_single_nat_gateway which creates a share.
All private subnets will route their internet traffic through this single NAT gateway
Common NAT gateway for all the private subnets. So that they can route their Internet traffic through this shared nat gateway. And finally, we want to enable_dns_hostnames inside our VPC.
So, for example when EC2 instance gets created, it will get assigned the public IP address, the private IP address, but it will also get assigned the public and private DNS names That resolve to this IP addresses and we want to enable that as well.
And finally, we want to add a bunch of tags, first to the VPC itself.


Now you may be wondering what this take is or why are we setting this. So we have used tags to label our resources so that we know for example which environment they belong to. So, we have a tag with environment prefix DEV for example and so on. So, one use case is tags are for human consumption so that we can detect using the label that it’s a dev resource for example. However, tags are also for referencing components from other components programmatically. So, in eks cluster when we create the control plane, one of the processes in the control plane is Kubernetes cloud Control manager. And this cloud control manager that comes from AWS is the one that orchestrates connecting to the VPCs connecting to the subnets, connecting with the worker nodes and all these configurations, talking to the resources in our AWS account and creating some stuff . So, Kubernetes cloud controller manager needs to know which resources in our account it should talk to. It needs to know Which VPC should be used in a cluster. Which subnets should be used in the cluster and so on, because we may have multiple VPCs and multiple subnets and we need to tell the control plane or AWS use these VPCs and these subnets for this specific cluster, We may also have multiple VPCs for multiple eks clusters, So it must be specific label that K8S cloud controller manager can detect and identify.
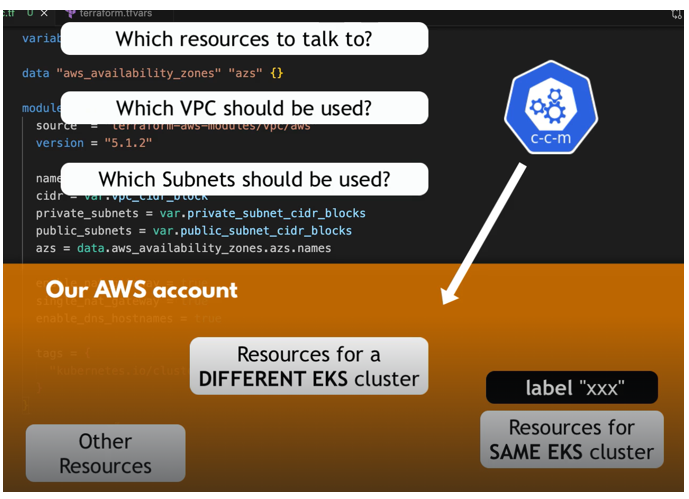
This is the VPC and these are the subnets that belong to my cluster. So, these are the ones that I should connect to. So, the same way as we tag the VPC, we need to tag the subnets as well so that the subnets can be found and identified by CCM. So, we are going to tag the public subnets and private subnets.
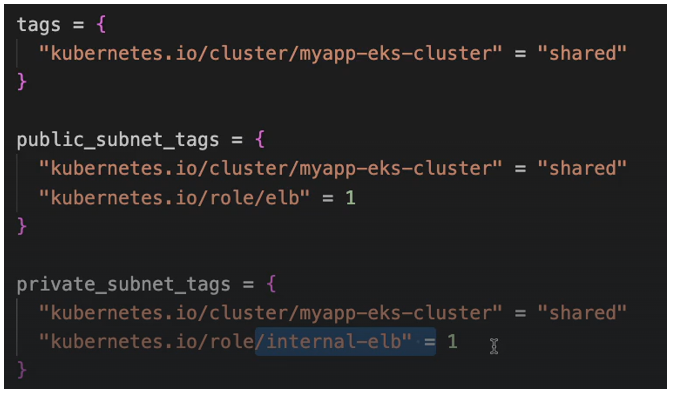
why we have the cluster name here because obviously if we have multiple clusters, we can differentiate the VPCs and subnets or the labels using the cluster name. Now for the public and private subnets, we need one more tag respectively. So, in public subnets we’re going to add another tag called kubernetes.io/role/elb=1
for private subnet, we’re going to have kubernetes.io/role/internal-elb=1
So public has the ELB which stands for elastic load balancer and private has internal ELB. So, when we create load balancer service in Kubernetes, Kubernetes will provision in cloud native load balancer for that service. However, it will provision that cloud load balancer in the public subnet because the load balancer is actually an entry point to the cluster.
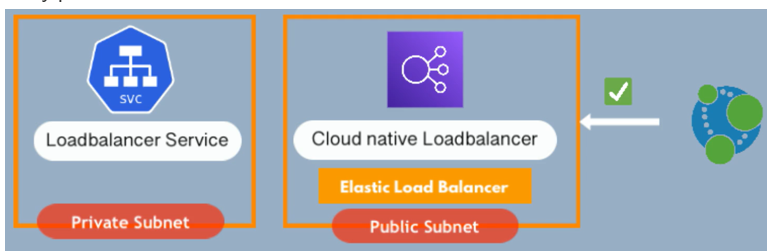
Load balancer it should be accessible from outside and load Balancer gets an external IP address so that we can communicate to it from outside like from browser requests or from other clients. And since we have public subnets and private subnets in our VPC, the public one is, or public subnet is a subnet that allows communication with Internet. Private subnet is close to Internet. So, if we deploy load balancer here, we can’t get to it. We can’t access it because Private subnet is blocked, It doesn’t allow any external requests, so Kubernetes needs to know which one is a public subnet so that it can create and provision that load balancer in the public subnet so that the load balancer can be accessed from Internet. So that’s how it differentiate it and they’re also internal load balancers in AWS which will be created for services and components and components Inside the private subnets.
And in this case, as I said, these tags are for consumption by the Kubernetes cloud controller manager and AWS load balancer controller that is responsible for creating load balancers for load balancers, service types for example. So those two master processes are the ones that need those tags to identify the right components and to differentiate between public and private subnets.
So that’s why we need those tags and they are required because if we don’t specify them and those controllers can’t actually identify the resources, then we will get an error.
And that is it for the VPC configuration. So, this will give us the VPC that is configured properly for an eks cluster with a best practise configuration of having private subnets and public subnets in each of the AZs. So, our VPC configuration is done. So now I can execute Terraform Plan and first validate our configuration and then also see what we’ll get configured. However, before we do Terraform plan, remember that whenever we create a new module, we must do terraform in it first.
the provider plugin’s as well as modules get installed because they are just dependencies that need to be downloaded first before they can be used, and they both get downloaded in this dot terraform folder if I expand it. There you go.
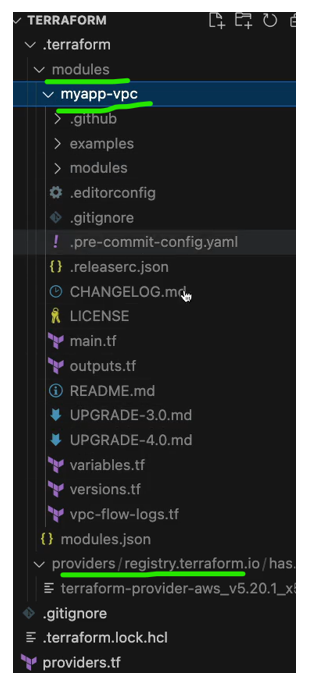
we have the provider section where we have the AWS and we have the modules.
myapp-vpc, that’s how we call it and here we have the source or the code. configuration of this module. So, all the code of the module is downloaded locally so that we can use it. And now if we do Terraform plan.
However, we still must configure the Eks and other resources before we apply this.
EKS Cluster & Worker Nodes
Create a new file and I’m going to call it eks-cluster.tf And this time, we’re going to be using an eks module, so if I go back to Terraform Registry, we have a module for eks, and this will create all the resources needed to create the cluster as well as any worker nodes that we configure for it and provision some of the parts of Kubernetes.

I’m going to copy the basic usage syntax for this module and we’re going to start off with this. So, first, we have the source which is again from Terraform Registry. So, when we do terraform in it it’s going to be downloaded locally and installed and we also using the latest fixed version. And it’s a good idea to version.
All our components generally because it makes it more visible or of which versions are used in case some problem happens. So, you can debug easily and know exactly which versions are your modules like we defined here, and you can also version providers.
So Eks module also takes lots of parameters start setting those attributes 1 by 1.
So, the 1st attribute we need to give that is cluster name, so we need to call our cluster something and we already decided on the name of the cluster because we are referencing it in VPC configuration.
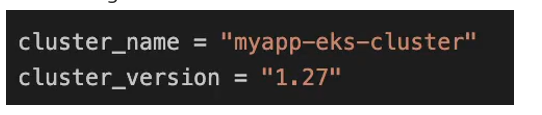
We’re also going to set the version, and this is going to be Kubernetes version. actually. So, we have cluster name and Kubernetes version.
next attribute subnet IDs so subnet IDs attribute is a list of subnets which we want the worker nodes to be started in, So we have created a vpc with six subnets. We have private subnet and public subnet in each of the AZs. And the private subnet are ones where we want our workload to be scheduled. The public subnets are for external resources like load balancer of AWS, for example connectivity. But the workload we want it to be in the private subnet for security reasons because it’s not exposed to Internet. So here we’re going to specify the private subnets, and we can do that by referencing our VPC module because we have the private subnets exposed from this module. See the documentation of VPC module.

So, this is going to be an array of private sub-IDs, and these are some names where our workloads will be scheduled.
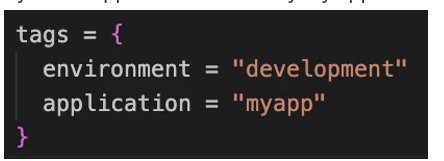
We can also set tags for the AKS cluster itself.
- we can set environment. And let’s say it’s development cluster, so this just for our own reference
- we can also say which application is it for say my app name.
Now in addition to subnets or the private subnets where workloads will run, we also need to provide a vpc-id

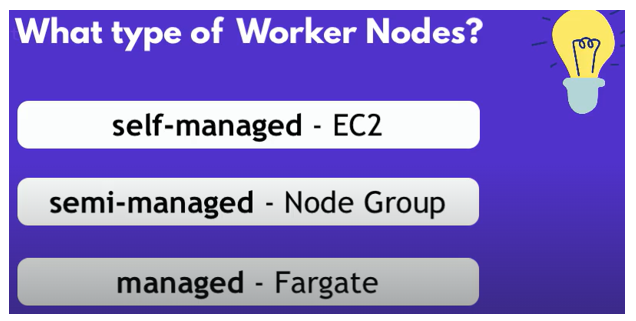
Now one thing that’s missing are the worker nodes, We need to configure how we want our worker nodes to run or what kind of worker nodes we want to connect to these cluster. And there are lots of different ways. So we can have a self-managed EC2 instances as worker nodes. We can have semi managed EC2 instance, Which is created by node groups. In this case we could use the node groups managed by eks with Eks managed node groups attributes
Now, how do we know how to configure this object or what attributes and values we can use inside? Because the default value is just an empty brackets, so we need to know obviously what goes inside what we can see example usages in the readme of each module. So right here if I look for Eks managed node groups you see an example of how that managed node groups can be configured. So based on that we can create our own configuration and as you see we can define multiple node groups inside this attribute.
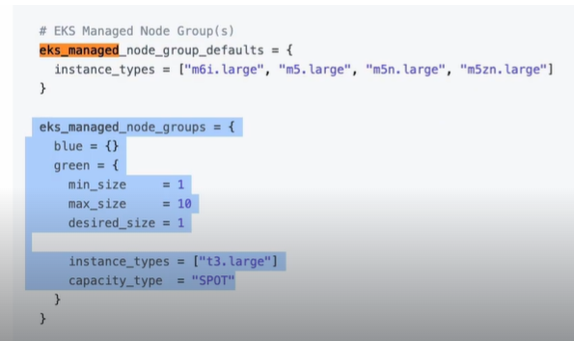
We can have blue-green deployment, or we can have development, staging, et cetera, where each group will have its own name and inside that group we can have one or more instances and we can define configuration for those instances right here. So, I’m going to copy this whole example and let’s set the values that we want for our cluster.
Also, in terms of pricing, whenever we create EKS cluster, we actually get charged for the eks cluster itself which is around $0.10 per hour for an single EKS cluster plus for all the EC2 instances that we have running as worker nodes.
So first, because we added a new module, the aws eks module, we need to start by running Terraform in it because Terraform in it downloads all the providers or modules that we are using in the script.
You just must define two modules and pass the parameters that you are interested in. So, this way you have a high-level configuration. That you can tweak with parameters or customise with parameters. So, we have all the VPC configuration as well as the managed node groups that we defined which are using the EKS module as well as their associated IAM policies which are going to set the permissions for this.
So, remember when we did all this manually by ourselves, we had to create the role for the cluster and for the node group as well this. Takes care of all of these, so the eks module defines those roles and how they should be created so we don’t have to configure them. So, it looks pretty good. We didn’t make any spelling mistakes or any configuration errors, so let’s go ahead and apply.
And now the resources will be created. So, this will take 10 to 15 minutes because of how many resources it needs to create in the background.
EKS Cluster Overview
So now let’s head over to the AWS management console and check the resources in the UI and here is my cluster which is active.
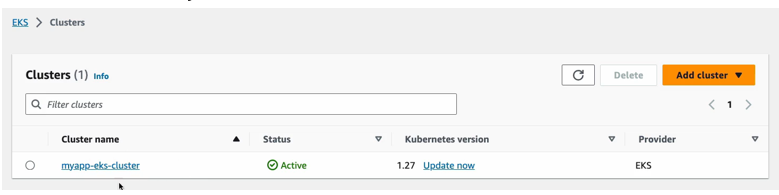
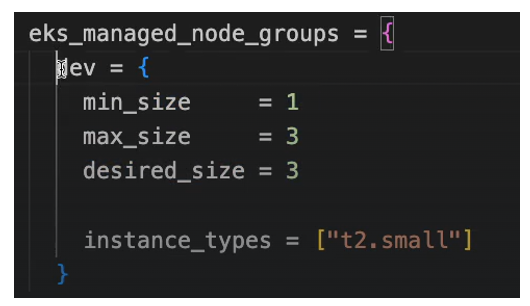
This is Kubernetes version, and these are the nodes that we defined right here. So, the worker node configuration where we define that we want 3 instances.
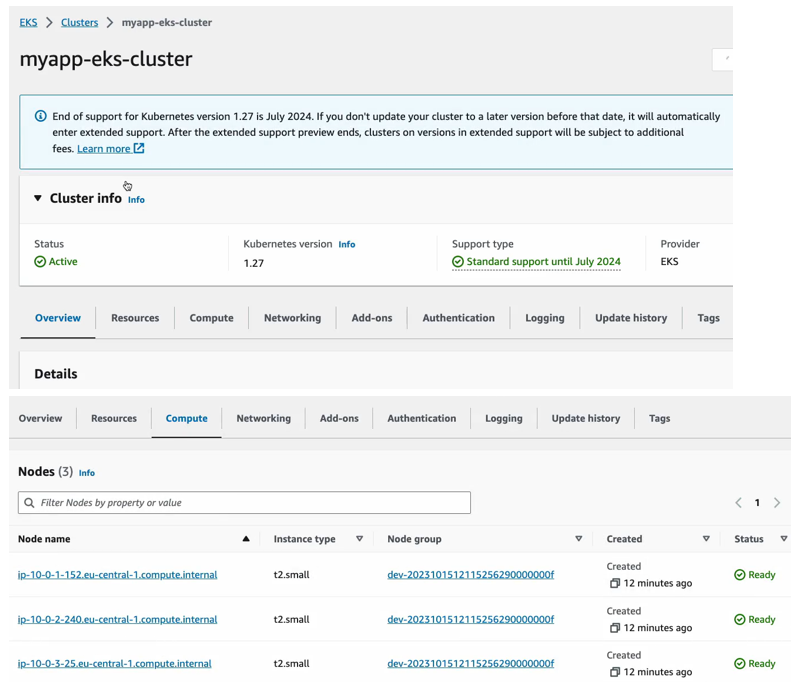
The desired size with instance type T2 small and that’s what we got here. We have 3 instances with T2 small type. This is our node group name and all three are in a ready state.
We can also check out the resources which is things that are already running on those worker nodes, and these are Kubernetes workloads for example like pods and stateful sets, demon sets et cetera. And what you see right here we have three queue proxy pods, so queue proxy pod is running on each of the servers. Each of the worker nodes same with AWS node and we have two instances or two replicas of core DNS running in our cluster and here you can see other configuration like config maps and secrets and obviously these are all the defaults that eks and Kubernetes when you install it gives you inside your cluster. So, these are all Kubernetes processes to run the cluster and in addition to that you can also see some configuration data for the AWS eks cluster itself like the server endpoint.
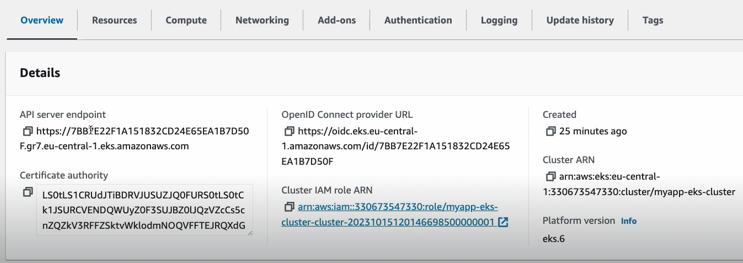
The Certificate authority data which subnets are part of the cluster.
Again, the Node group name, the list of node groups, or whichever you have available.

Now let’s go and check out. The IAM service. Roles and I will look for my app because that is the wording that we used in our Terraform configuration and you see here that this role has been created.
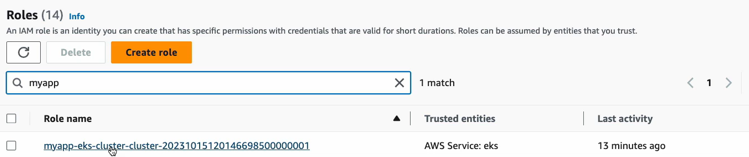
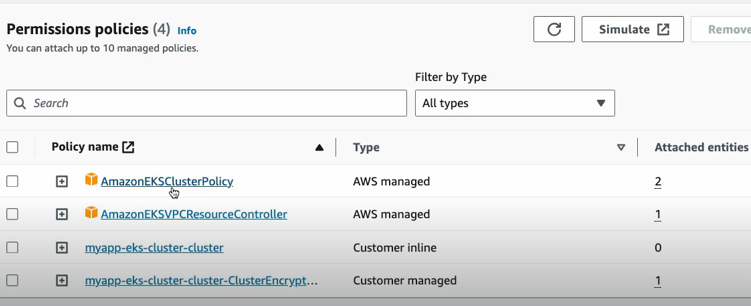
This role is something that we would have created manually in AWS previously. This time they have created automatically from the EKS module that we used. So the policies that are associated to this role are also here.
Now if we use the search bar to look for EC2, we can now go and check out.
The EC2 service.
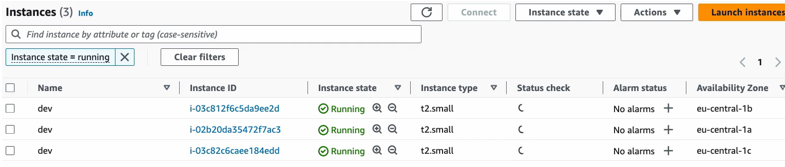
So, these are the three nodes that we saw they’re running in our AWS account and as you see right here, each one is in a different availability zone, which is a great thing because we have high availability by distributing our servers across AZs.
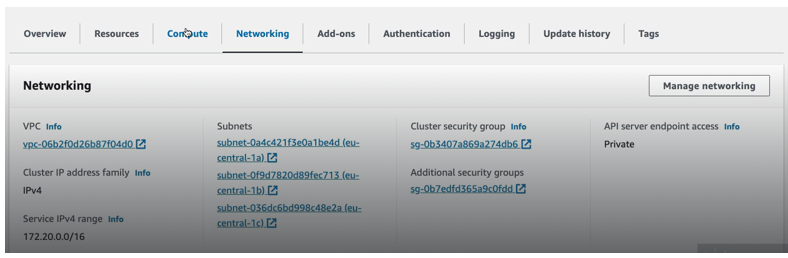
Now we can also check out the VPC service. So, we have the default VPC. Obviously, that comes with the region, and this is the VPC that we created

This is the cider block we have defined. all those default components got also created. Let’s check out the route table.
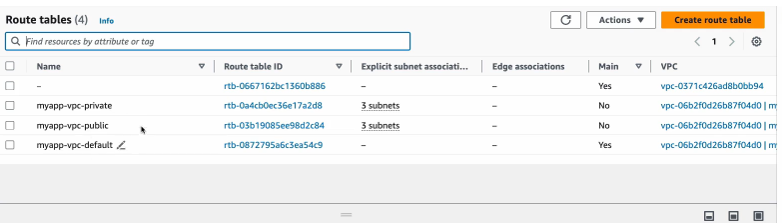
Three raw tables got created for our VPC . 1 is a default one and we have two different raw tables with different rules and let’s check this out. So, we have one route table for our VPC that was created with an Internet gateway route. So, as you remember, Internet gateway allows VPC to talk to Internet right to connect to Internet.
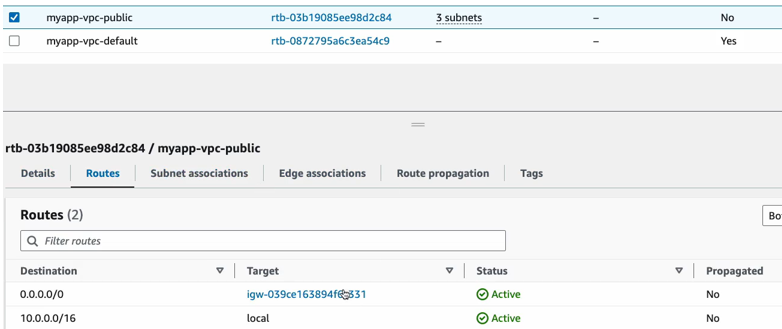
So basically, send our traffic to Internet and allow traffic to come into the VPC. So, we have one route table that routes the internal traffic within the VPC. This is the VPC cider_block and the connection with the Internet.
we have another one that also has the default VPC wide routing, and it has a nat routing. So, this is basically a route that allows worker notes to connect to the control plane notes and the reason we need that is because our worker notes are in one VPC and the control plane notes are in another VPC in an account which is managed by AWS. So, these are resources in two different VPCs, or two different private networks, and they must talk to each other and AWS makes that communication possible without an Internet gateway. But using this nat gateway instead. So, the resources can still privately talk to each other from different VPCs, and that’s basically the configuration for routing traffic back and forth from control plane nodes to work notes and back.
we also have subnet association with those route tables. So let’s actually go into the subnets.
So, we have 6 subnets that got created in addition to the default subnets that come with the default VPC. So, for our VPC we have six different subnets and three of them are private and three of them are public. And as you see they are evenly distributed. So, each AZ basically has private and a public subnet and I’m going to click inside and let’s actually see the route table association for each.
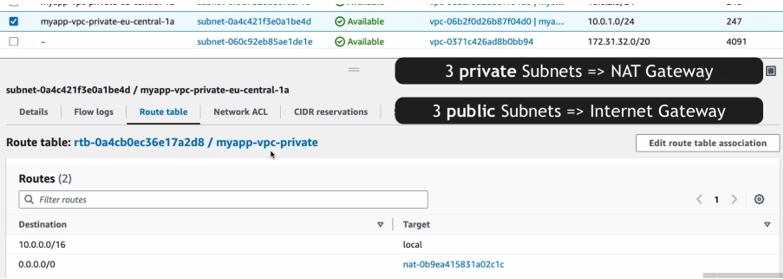
And as you see here all the private subnets, they’re associated with this route table that has nat Gateway route And the public subnets are associated with a raw table that has Internet gateway route because they need Internet connectivity .
And let’s also check the security groups for our VPC.
And as you see, there are four different security groups that have been created. One is a default that gets created and we’re not using the default one. We actually have three security groups that have been created in the background using the VPC module, and one is actually the eks cluster security group. Let’s check the inbound rules.
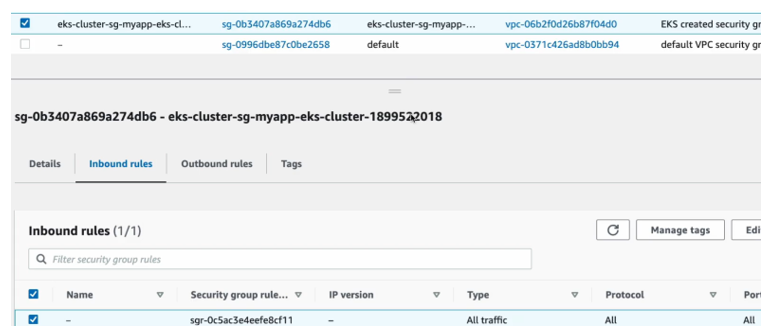
This basically allows traffic all types of traffic on any ports within the cluster, Because the pods and services and notes they must communicate with each other from the different worker nodes as well as communicate with pods, containers and services on control plane notes. So, this is what this security groups are actually for.
other two are for the note group and the cluster. And here actually you have the inbound rules again and detailed description for each one of the rules in the security groups.
So basically, as I explained previously. We have two separate VPC.
worker nodes and one for the control plane nodes and all the components. All the services running on worker nodes in control plane nodes must also talk to each other across these two different VPCs, and the services run and listen on various ports. So, with these security groups, we’re basically opening the ports so that these services can talk to each other between those two VPCs. So, we are opening the correct ports on both work nodes and control plane nodes.
The source of who can access those ports are the security groups themselves, which again complies to the least privileged requirement of security. Because we’re saying only those resources that need to talk to each other will have permissions to talk to each other. So, we have the minimum required permissions on different ports from different resources and instead of having IP address ranges as the source of the communication. So, who can actually talk to the services on these ports?
We have security groups as sources where those different services are running, and again a good thing about this is that you don’t have to understand every single detail of this. Most of the stuff happens in the background. However, if something isn’t working connectivity, you can still go here and check out the inbound rules and check out the description here in case you need it. So, these are all the stuff that got created plus some other resources, but they’re not. Interesting for us.
And now that we have a cluster running with three work nodes, let’s try to connect to it using kube ctl and let’s deploy a simple test application.
Deploy nginx-App into our cluster
So how do we connect to our cluster now using KubeCtl?
So we need to do 2 things. First, we need to configure our environment so that kubectl can connect with our cluster and as you know, we do this by using AWS Eks command which updates our cube config file so that it has the correct CA certificate token, IAM Authenticator and so on.
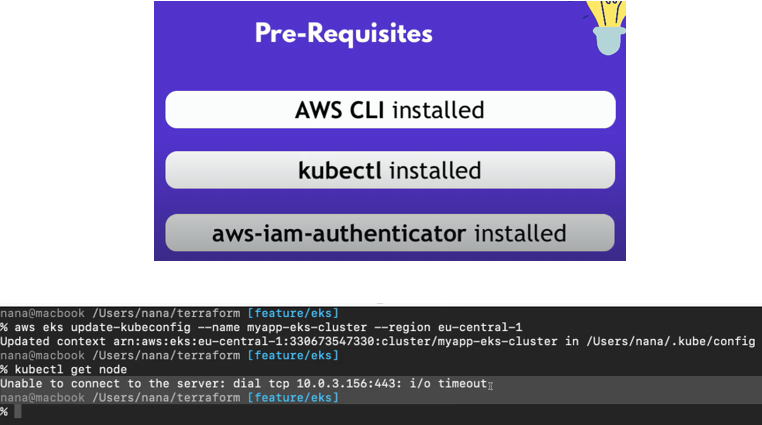
let’s execute this and now you see that the context was configured in my user’s Home directory in the dot cube slash config file. So, this file should now actually contain all the information that kube CTL and AWS IAM authenticator need to authenticate with AWS and then authenticate with the eks cluster. So now if I do.
KubeCtl get node on the command line.
Even though we have updated our cube config file, this is going to timeout which means there is a one more thing we need to configure.
if we go back to our eks cluster Terraform file underneath the cluster name and cluster version. Here we need to explicitly enable public access to our cluster.
If we go and check the official documentation, you can see that we need to set public access to true using this attribute.

So, let’s copy this and add it to our configuration, which basically makes our Kubernetes cluster or the API server process on the Kubernetes cluster publicly accessible from external clients like KubeCtl from our local computer.
So now let’s check by using Terraform Plan that these changes are going to be applied. And here we can see that there are no errors, and the cluster info will be updated. now let’s do Terraform apply.
Apply complete so the changes have been applied so we can go back to the terminal and run the AWS EKS command again.
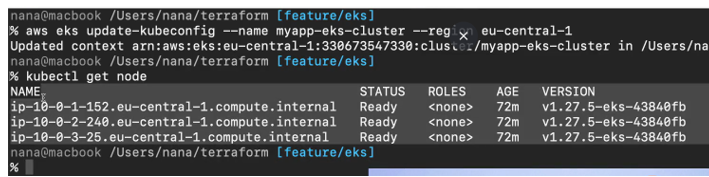
We got three worker nodes that we deployed is an output. So, we are connected to our cluster and obviously we haven’t deployed anything. So, the cluster is empty.
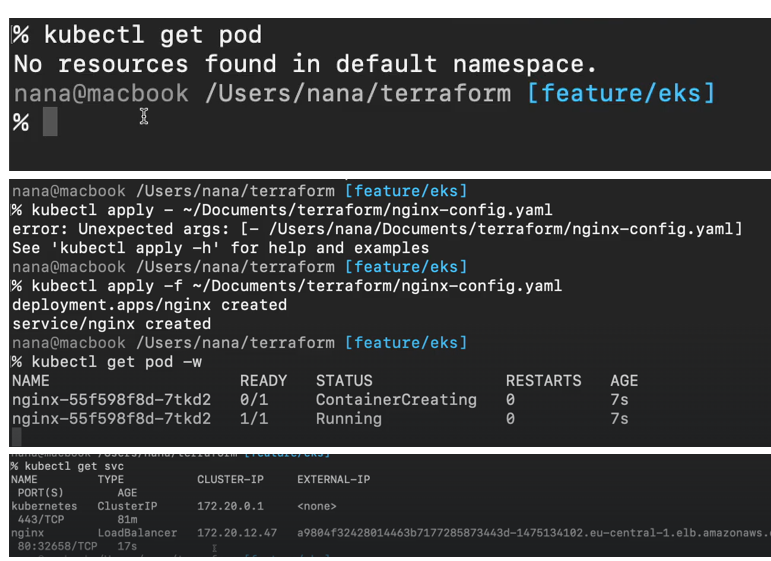
Which is a load balancer of a load balancer type. So, it is accessible externally. So, let’s go back to the management console and I’m going to go to EC2.
And load balancers.
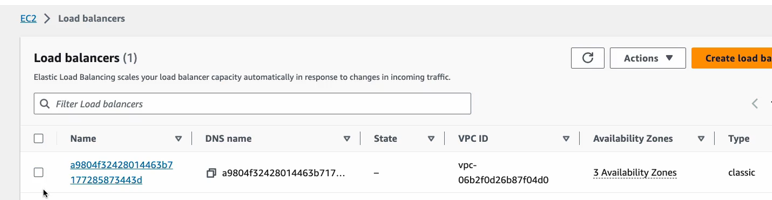
And one load balancer got created because we created a service of type load balancer That’s the type that I have defined in yaml.
cloud native load balancer got created and as you see right here the load balancer is available in all three availability zones in the region that we specified. So, it is accessible and highly available, and it also has the DNS name that we can access it from. And remember that we created public and private subnets. In our VPC configuration. So basically, the private ones for running our private workload. These are the pods and public subnets for public resources like load balancer. So, these are the three subnets for our load balancer and if I click in one of those.
This is a public subnet, so all these three subnets are the public subnets of.
Each AZ. So, let’s grab this DNS name.
And execute and. There you go. Welcome to Nginx .
we have access to the load balancers from outside and as you saw the port 80 got automatically opened. You see the port configuration here, so we don’t have to adjust the security group and open the port. It all happens automatically when the load balancer gets provisioned. And this is basically how it works.
Destroy all components
And finally, once we’re done, we can destroy the whole cluster with all the configuration, and we can do that very easily using Terraform destroy

And that’s the best part of Terraform because even though we took some time to put together all this configuration and go through all these attributes and figure out what is what, you only have that time investment once. You only need to configure all these and understand all these attributes once. So, once you have the configuration set up here, you basically just do apply, and you can spin up the whole cluster again without doing any manual work. And when you’re done with it, you can just destroy it and then bring it up the next day again. And this makes the process of recreating your infrastructure or replicating your infrastructure very easy, so you don’t need to worry about forgetting something and misconfiguring something when creating a cluster, because if it works once in Terraform, it’s going to work the next time as well. And once everything cleared, to make sure the components don’t exist anymore, we can do terraform State list and this should give us an empty list, so we don’t have anything in our state anymore.